top of page

Email Lists & Groups

To read about it

You can read about your email campaigns when in email marketing section on your dashboard (see left navigation)

Create or Import your contacts

I created couple of contacts for testing, I will delete them later.

Go to your Contacts section on the left navigation bar. 

You can Import your contacts from gmail, or upload CSV file with contacts, or write them by hand.

Add Labels

If you want to create different groups to refine your email campaigns, you need to assign labels to your contacts.

Check the contacts you want to label and click the button Add Labels above the list.

Create a New Label or Delete one

The pop-up window will appear. 

Choose from the existing list of labels or create a new one.

You can select one or several labels.

In this example I created label "I don't understand" because I had a hard time to figure it out :)

There is the link Manage Labels on the bottom left of this pop-up. Click it to delete, create or edit labels.

Create a New Label - the tricky part :)

And the tricky part is that you need to click the check mark for the label appearing in your list of labels.

I don't know why it took me so long to figure it out  :)))

Assign a Label to your contact

Now, when it appears in the list of your labels, select it and click the Add button for your contact.

Another way to Assign a Label or a Segment to your contact

Alternatively, in the list of contacts you can click on View button for your person to open it up. You'll see all the information for the contact including all the labels for it.

Here you can add or delete labels and segments.

As you see, you can attach an image or any other file to the contact.

Add a Segment to your contact

It's not a nessessity, but you can add a Segment to you contacts to refine your mailing lists.

For that you need to select Segments from your left navigation bar in the Dashboard.

Creating or Editing a Segment 

On this page on top you can see the link to learn more about segments.

Here you can see two segments I created.

Click the Tree Dots on the right to edit or delete them.

Click the button Create Segment.

Creating a Segment 

The new pop-up window will appear.

Put a name for your segment. You have to add at least one filter to your segment.

Choose a filter for your segment

The new pop-up window will appear.

Choose a filter from the list. .

Say, you chose Label. The list of your labels will appear to choose from.

You can choose one or several filters for your segment.

Now you can start your email marketing

When you send your newsletter, you can add 

one or few segments, labels, or separate recipients.

Blogging & Creating Emails from Blog Posts

Creating & Editing Blogs

Select Blog in your Dashboard left navigation bar.

You can see the list of your posts there. You can click on Edit or Create New Post. You can also dublicate a post.

Creating & Editing Blogs

Click Edit a post - it will get you into Blog Editor, where you can write, add images, videos, tables, change the appearance.

By the way, you can add any file to your blog, for example you can add PDF - it won't show the content but the file will be downloadable.

Managing Images

You can manage pictures appearance. When you click on a picture, a bar with options for it appears.

You can choose the size (small, medium or original) and the placement (left, right or centered) of any image. 

Newsletter from a Blog Post

When you finish editing your post, click Publish button.

That will bring Promote your post pop-up.

Now you can create Newsletter from your post or Pubish it to Social media.

Adjusting your Newsletter

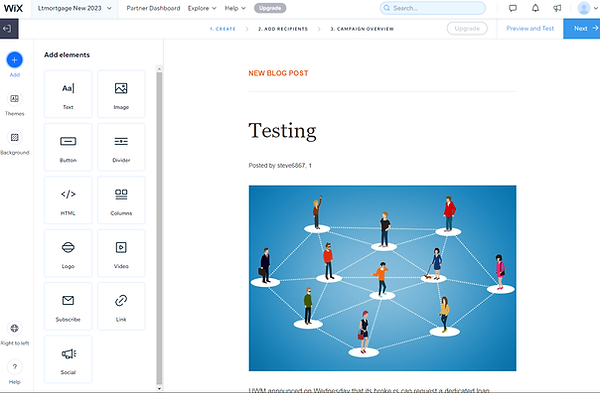
If you click on Create Email Campagn, it brings you to Email Editor. It's similar to Blog Editor.

Here you can change your Theme or add some elements to your mailings, like images, buttons, links, subscribe and more. 

When you're ready, click the Next button on top, it will bring you to the mailing list.

Add Recipients

You can add recipients by checking the boxes of your labels, segments, or single contacts - they will appear in your address line.

The good thing is that Wix automatically removes doubles when your contacts are in several different groups.

Click on Next link on top of the page when you're done with the list.

CampaignOverview

Campaign Overview

This will bring you to the Overview where you can edit the title and some details and Send it now or Schedule the sending for later.

1. Edit the Title.

2. Edit the Sender details!!!

Wix will verify your identity by sending the code to your email. That is why Lenty couldn't do it for you.

Hooray!!!

How To Change Page Password

Changing Your Page Password

  1. Select Pages on your Editor. 

  2. Select the Site Menu on the next column.

  3. Select The Page you want to protect. Click the three dots on the right side to open the menu.

  4. Click on the Setting and from there

  5. Choose the Permission tab to set or change your password.

bottom of page